So I've actually made some progress on my install(after the parts have been sitting for over 2 years) and I should hopefully have it running in the next week or so. So here are some pictures of the progress.
The bus is a 1968 with a dual port type 1 engine in it. Everything else prior to the install was completely stock with the exception of the 55 amp alternator swapped in.
For a trigger wheel I copied the design of someone else on here, drilling out 36 holes on the pulley, so that the spaces between them would function as the teeth:
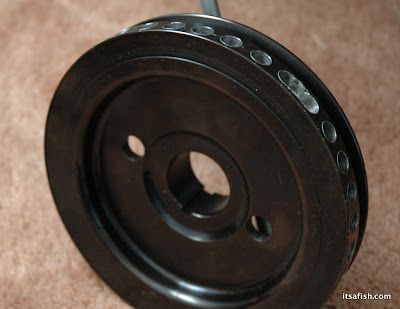
The missing tooth was cut an extra 20 degrees BTDC in order to allow the sensor to VR sensor to be mounted on an angle so it would not interfere with the alternator pulley.
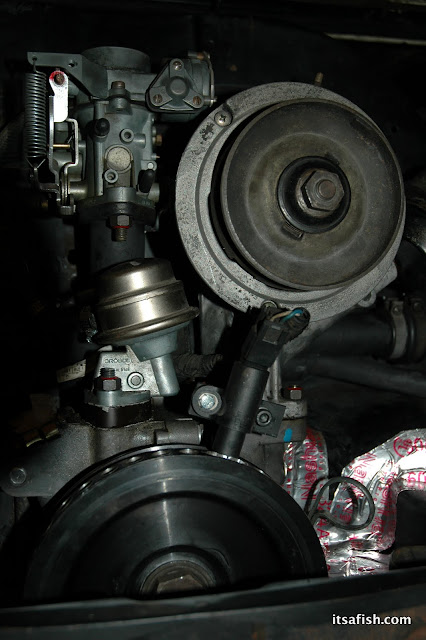
The mount for the sensor was just made using a couple pieces of angle iron.
One of my goals was to reuse the mounting holes for the original coil, so to accomplish this, I used more angle iron. Initially I drilled 2 holes in the piece of angle iron the same width as the mounting holes to attach it to the fan shroud. I then welded 2 bolts to the angle iron point straight out so that the holes in the coil could just slide on over it. It was then held in place by 2 nuts
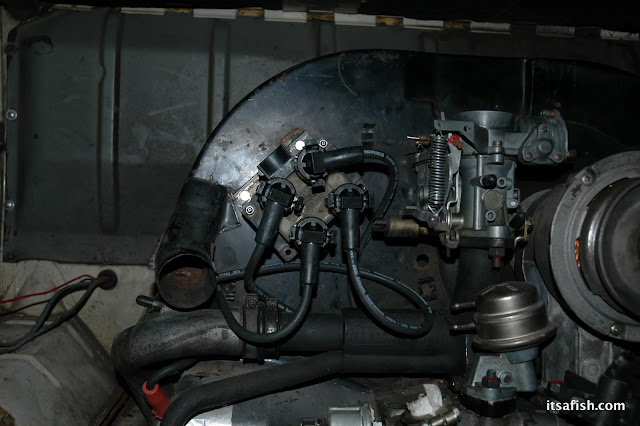
Plug wires were from a V6 ford ranger. Somehow no local stores had Escort wires in stock, so I got the ranger ones for $3 more. On the plus side, it gaves me a couple different lengths of wire to work with.
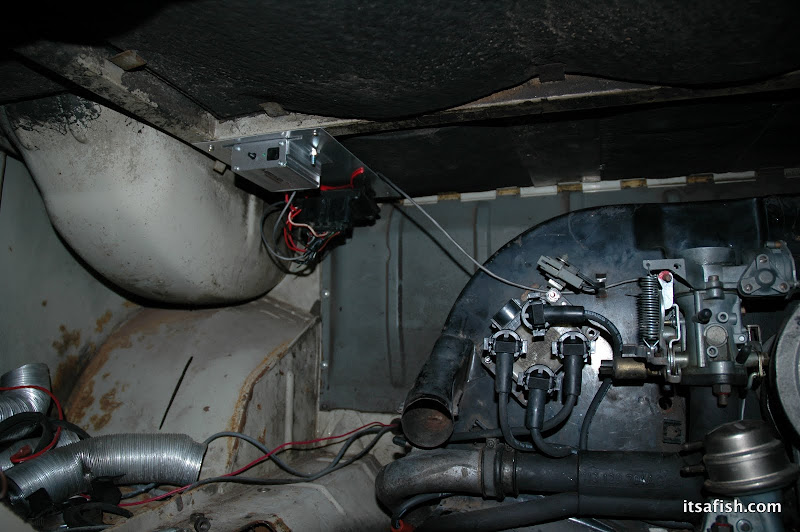
And then most recently was the mounting of the EDIS controller and the megajolt. For that I just attaced them both to a piece of aluminum sheet metal.
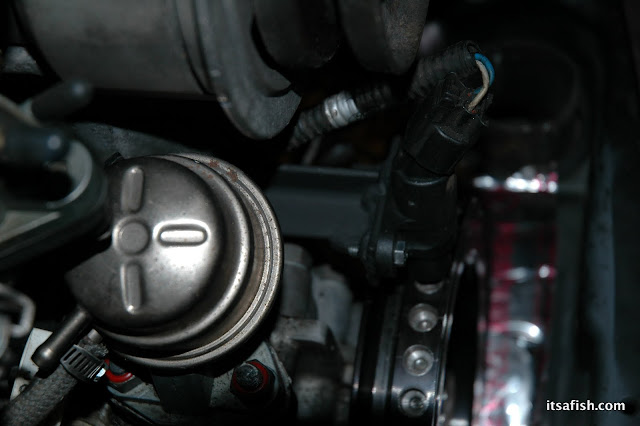
I decided to keep the ford capacitor that came with the coil simply because I had it and didn't see there being any benefit to omitting it.
Connection for the VR sensor to the EDIS controller, and EDIS to megajolt was using some 22/2 shielded wire from Home Depot for $.20 a foot.
All that remains is adding a relay and wiring up power and ground to everything. Running the power and trigger lines to the coil from the EDIS controller. And lastly the vacuum connection from the manifold to the MAP sensor in the megajolt.
1968 VW Bus install (type 1 engine)
Moderators: JeffC, rdoherty, stieg, brentp
I love the writeup! Thank you for sharing!
Have you noticed a dramatic improvement in timing stability? i.e. observing the timing using a timing light using the distributor and then after, with Megajolt enabled?
This would be an excellent before:after video, would be worthy of a bounty
Have you shared this with your VW community? would be interesting to hear feedback.
With the wiring I have left, it will probably be middle of next week before I get it started. Since all the parts for the distributor are right there, I can easily do some comparisons between MJ and the stock distributor. And get some video if there is a significant difference.brentp wrote:I love the writeup! Thank you for sharing!
Have you noticed a dramatic improvement in timing stability? i.e. observing the timing using a timing light using the distributor and then after, with Megajolt enabled?
This would be an excellent before:after video, would be worthy of a bounty
Have you shared this with your VW community? would be interesting to hear feedback.
One thread on the Bay Window bus forums on the samba: http://www.thesamba.com/vw/forum/viewtopic.php?t=432368
Generally the response seems pretty poor. Some people get it, but most don't seem to. General impressions from people seem kinda negative. Too complicated, too much work, too much money, too many points of failure? In my mind Megajolt is far better in all those aspects.
One big driving factor for my swap was that my current distributor was from a beetle, and didn't pull appropriate timing for a bus. And the cost of the MJ was pretty much on par with what it would cost me to put together/rebuild a decent bus distributor. Plus all the extra flexibility I would gain from it being programmable.
Brent, I didn't have any video of comparison, but my distributor was +/- 5 degrees at 3000 rpm! The Megajolt is rock steady, some people have asked me if I have EFI, but I am on Weber carbies. Type1 VW, and I gained rock steady idle, more power everywhere in the curve, and just smoother, as we all know.
I have a 63 bug with a 1835 engle 120 40x35 heads and dual 40 idf's and I have been running the megajolt now for 4 or 5 months and I will never run a distributor in an aircooled vw again, I went from 2 or 3 degrees of timing scatter to 0 degrees of scatter with the megajolt and I do mean rock solid timing at all rpms, the car runs better, performs better and gets better MPG..... Needless to say I am one very happy customer.
Got motivated and put a couple more hours into it tonight. Wired up my coil, power via relay to everything and grounds. So I grabbed my remote starter and timing light to test things out.
Had the megajolt disconnected so it was only the EDIS and got it cranking and had nothing. Swapped the wires on the VR sensor because I had only guessed to begin with.... and we had SPARK! It looks great with the only issue being the timing was at 5 degrees BTDC instead of the 10 it's supposed to be. So apparently my sensor is off 5 degrees, but that can be fixed in the Megajolt software, right?
Still need to clean up my wiring, and reconnect pretty much every other piece that goes to the motor before I can actually start it, but I'm sure it will start right up once I do.
David- Great progress so far!
Here's how I've imagined a nearly ideal video:
- Have both distributor and megajolt system installed; engine can be run on either systems by switching plug wires.
With stock distributor:
- using timing light, video timing scatter at idle, *and* wihile revving engine up to approximately 2500 RPMs
- video engine idling for a short period of time (30 seconds or so) to observe idle stability
Without breaking video, switch plugs to Megajolt system.
- using timing light, video timing scatter at idle, *and* wihile revving engine up to approximately 2500 RPMs
- video engine idling for a short period of time (30 seconds or so) to observe idle stability
There is a nice bounty for the first who produces a good video that effectively captures the above!
Sorry Brent.... I only have video of the silky smooth idle after the MJLJ has been installed....
http://www.youtube.com/watch?v=e-58dK5FQLY
And don't be worrying too much about what the dudes on theSamba say about your project David.... There are way too many haters over there.... ShoptalkForums, Aussieveedubbers and my forum are all very supportive of this sort of thing....
Keep it up.... And don't for get the pics!
Cleaned up a bunch more of the wiring last night. Soldered together a few of my my guess and check connections (VR sensor & coil trigger wires) once I was sure I had them right. Ran switched power to all my appropriate places. I'm also basically redoing all the other wiring on the motor which is adding a bit of time to test firing the engine. Trying to run as much of the wiring as possible through a single connector to expedite future engine removal.
Will have to take more picture the next time I work on it.
So I still don't have the rest of the fuel lines hooked up on my motor, so I've just been doing some minor testing with no expectations of it start.
But today I added a vacuum line from the manifold to the MJLJ and figured I'd hook the laptop up and do a bit of testing. So while cranking configuration software was reading the manifold pressure just as expected, but I wasn't getting any reading on the RPM's via the software(which was 370 per my timing light). So I double checked my wiring and it seemed appropriate, and I was getting 12v on the PIP pin with EDIS powered on, and ~5.5v while cranking.
Am I missing something, or is this an expected behavior on a motor that is just cranking but not running?
With the MJLJ connected or disconnected, I get the same 5 degrees BTDC of ignition according to my timing light.
http://www.youtube.com/watch?v=t6ItnKQAWnQ&hd=1
A bit more progress. It just dawned on me that I never recapped the 2 vacuum ports on the carb that the distributor used... Which could possibly explain why I couldnt get the idle to fall down below 1300 rpm's without dieing.
No big updates really. Capped my vacuum ports and was able to get the idle down around 900 RPM's. But I had to basically bottom out the bypass screw on my carb to get there, which doesn't seem too right. From the sounds of things, it also sounds like my valves are a bit out of adjustment.
So the next set of plans include:
Valve adjustment
Compression test
Carb rebuild
Then re-adjust carb and cross my fingers I can get a smoother idle.
With the stock distributor, I had the same idle issues, and wasn't able to get the idle down under 1300 RPM's.
Most of this won't come until after the new year though. Silly class finals getting in the way of my progress.