
hi all,
i am completing an EDIS8 installation.
the system is operational, but the car wont run. it will just start, but is plainly misfiring terribly.
in the EDIS8, the cylinder pairs fire at 0,90,180,270 deg, so i have marked the crank pulley with A,B,C and D, at those degrees of rotation. that should equate to coilA, coilB, coilC and coilD.
for the coil packs, i have used one coil pack as A and D, and the other as B and C, simply because that simplifies the lead layout on this particular motor.
so, i have been testing the firing, with the motor running on the OEM system, and the EDIS coils firing into dummy plugs.
when i put a strobe on to any lead on the A or D coils (ie on one whole coil pack), the strobed image flickers between A and D. exactly the same thing is happening with the other coil pack ie the strobed image flickers between B and C.
so this implies that the first pair of cylinders, which should just fire at 0deg, are actually firing some of the time at 0deg and some of the time at 270. the second pair, which should fire at 90deg, are firing partly at 90deg and partly at 180deg. well, that certainly explains the misfire!
question is what could cause that? i have triple checked the A,B,C,D wiring out of the EDIS8 plug, and that is confirmed by the fact that A and D coils are being fired by both the A and D wires. same for the other two. the EDIS and coil packs are, of course, used. the fact that both coils are doing the same thing effectively rules out faulty coils, as they would hardly have the same internal fault. testing with a a meter, and the EDIS disconnected, there is no connection between the A and D coil inputs, nor the B and C.
this is all running only on EDIS.
any thoughts?
regards
alexander
sydney, oz.
EDIS8 installation - odd firing behaviour.
Moderators: JeffC, rdoherty, stieg, brentp
hi brent. no progress, but i have not had time to have another look at it.
the crank sensor is aligned properly - the EDIS is firing very close to 10deg btdc. the sensor is no more than 1 mm away from the trigger, so that doesnt seem to be an issue.
as for the flipping between the two different timing marks, it seems to be random and fairly evenly divided between the two.
curiuos, huh?
the immediate plan is to check the VR output on an oscilloscope, and also pair the coils differently ie A/B and C/D, and see what happens then. if that yields nothing, i suppose a different EDIS8 would be in order. annoyingly, however, EDIS are almost unknown in oz, and i dont think any aussie cars use/d them, so that means ebay - where EDIS8 are not so common either!
anyhow, i will try the above on the weekend, and report back
i will add that i drilled radial holes in the harmonic balancer, as used and suggested by another forum member a few months back. what in inspired idea! i already had modified a distributor with a tiny trigger wheel and sensor, as i did with my other car, but thought the drilled harmonic balancer idea was so brilliant - and cost free - that i just had to give it a try.
regards
alexander.
this is the harmonic balancer (from an AMC 360 V8 ), drilled to create a trigger wheel. as noted above, this idea is from another contributor on this, list several months ago. without looking up just now whom it was, i will just say a big thanks to him for a really clever idea!
as the photos indicate, i wrapped a piece of paper around the balancer, then cut it so it was exactly one circumference long. then i folde the paper in 4. then i measured and marked each quarter into 9 divisions. then wrapped the paper back around, held it on with sticky tape, and marked each pen mark with the centre punch. an hour on the drill press later, and presto!
as the photos indicate, i wrapped a piece of paper around the balancer, then cut it so it was exactly one circumference long. then i folde the paper in 4. then i measured and marked each quarter into 9 divisions. then wrapped the paper back around, held it on with sticky tape, and marked each pen mark with the centre punch. an hour on the drill press later, and presto!
- Attachments
-
- PANA0022 - small.jpg (38.61 KiB) Viewed 10894 times
-
- PANA0021 - small.jpg (34.71 KiB) Viewed 10894 times
-
- PANA0020 - small.jpg (27.26 KiB) Viewed 10898 times
ok well, i have now put the probes on again and get a different pattern now. of course.
the odd +ve swing from one of the coil triggers is gone, but it still shows A & D, and B & C, triggering at the same time. which confirms the fact that i could see both the letters "A" and "D", and "B" and "C" at the same time with the strobe lightl.
note that the +ve voltage spike in the middle of the low voltage part of each wave form only appears when i have both the probes connected to the supply wire at the same time.
- Attachments
-
- a&d second try.jpg (89.17 KiB) Viewed 10808 times
Last edited by alexander on Mon Feb 16, 2009 8:05 am, edited 1 time in total.
for the record, a couple more images..
firstly, the VR output waveform, looking exactly as it should; and
secondly, the output of just one of the coil trigger wires, showing a much cleaner waveform than the earlier images. that is with only one probe attached ie not trying to measure both trigger signals simultaneously, and it is amazing how much of difference it made to the cleanness of the signal, NOT having the wires going to the scope, lying across one of the spark plug leads
- Attachments
-
- VR waveform.jpeg (105.81 KiB) Viewed 10805 times
-
- B only.jpg (84.62 KiB) Viewed 10805 times
Your scope isn't plotting right to left is it?
If not your sensor output is wrong, which could be confusing things. The falling edge should drop straight down, then it will return towards the midpoint as the sensor sees the "flat" at the bottom of the missing tooth, then finally spike back up on the rising edge. Something like this: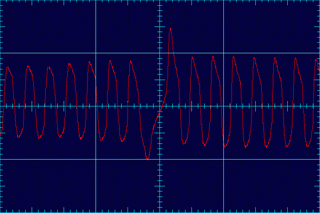
If not your sensor output is wrong, which could be confusing things. The falling edge should drop straight down, then it will return towards the midpoint as the sensor sees the "flat" at the bottom of the missing tooth, then finally spike back up on the rising edge. Something like this:
to take the image of the VR waveform i have unplugged the harness at the VR sensor and attached the scope wires, so the fact that the important part of it is in reverse is simply that i had the probes on 'backwards'. the VR is however connected into the harness the right way - one way around the EDIS didnt trigger at all, the other way it does.
cheers.
cheers.
-
Spockie-Tech
- Posts: 152
- Joined: Wed Jan 02, 2008 12:52 pm
- Location: Melbourne, Australia
Something to be aware of when using conventional (CRT) Oscilloscopes in dual channel mode is that the beam can only draw one wave at a time.
Hence, dual channel scopes, usually have a "Chop / ALT" button on them somewhere. This tells the scope to either
1. draw a piece of Channel 1, then a piece of Channel 2 and back and forth (Chop mode) - this puts little dashed line effects on the signal at high frequencies as the back and forth chopping becomes visible
or
2. Draw all of Channel 1, THEN draw all of Channel 2. This gives a smooth line, but means the 2 waves are NOT simultaneously being drawn and you cannot comapre events on one channel against events on the other time wise.
This may not apply to your PC-based scope (since it has a bitmap display, not a vector beam), although it might.. It may only have one Analog/Digital convertor in it to handle both channels and could be doing something similair. Read the docs, or look for a Chop setting in the s/w.
Worth checking into before concluding that events on the two channels are in fact simultaneous.
well! nothing like a major problem which just goes away all by itself, right?
*when i retested the coil trigger signals using the ALT setting on the scope, it showed, well, nothing useful. i dont think my cheap USB scope is fast enough to draw the two input images in a way which allows comparision of when they occur with respect to each other. i think i will have to read up more on how to use an oscilloscope properly
*putting that aside, i tried a different tack. i put the probe lead on the coil supply, and attached all 4 coil trigger wires to the earth lead. that yielded the image below. what it showed was that the coil trigger signals were evenly spaced and not overlapping. hmmmmm. so i put the test plugs back on the A,D coil pack, and, lo and behold, the timing light image was now rock steady on either the A or D coil, depending on which attached to, and not flickering between them. hmmm again. so connected all the leads to the coils, and the car started.
aside from the fact that the VR is not correctly positioned (edis firing just a couple of deg BTDC) the EDIS is now working. given that i have done utterly nothing other than disconnect and reconnect the coil packs a number of times, the cause of the original problem is now a mystery. now to connect a vacuum line, adjust the VR position, and plug in the MJ.
- Attachments
-
- all 4 triggers.jpg (85.32 KiB) Viewed 10770 times